Hasselblad 500C/M
The Hasselblad 500C/M

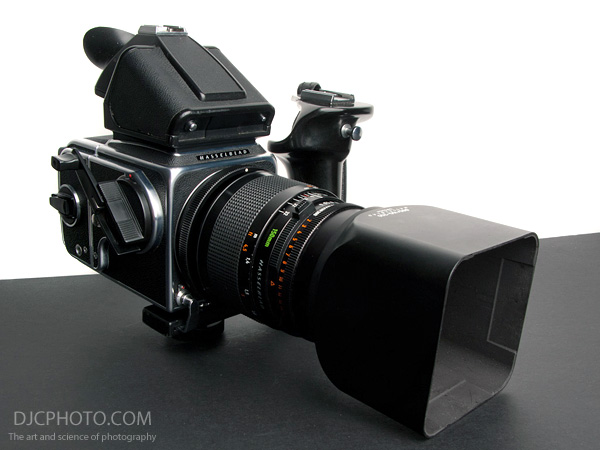
Hand-built in Sweden, the Hasselblad 500 series of cameras is one of the most popular medium format systems of all time. The brainchild of Victor Hasselblad, the original 500C model, launched in 1957, was also one of the first true system cameras. It embodies a modular design that allows components to be mixed and matched with ease to create the perfect camera for any specific assignment.
In this article, I will explain some of the features and benefits of this superb photographic tool and also discuss a few different configurations of the fully mechanical 500C/M model that demonstrate the flexibility of the Hasselblad V system.
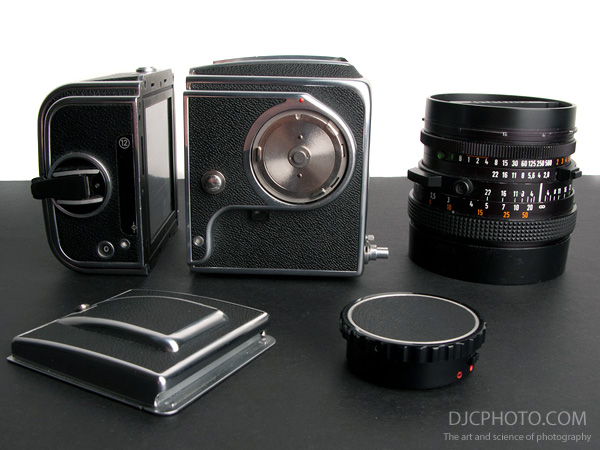
The basic V system camera consists of four main interchangeable components; lens, body, film back and viewfinder. Let’s take a more detailed look at each of these.
The Lenses
The single most important component on any camera is the lens. No matter how technologically advanced, reliable, or easy to handle the rest of the camera may be, if the lens doesn’t provide good optical performance, it’s all in vain. Fortunately, the lenses for the Hasselblad deliver it in spades!
Hasselblad have never been in the business of making lenses, and have always used optics from other manufacturers; from Kodak (for the 1600F) to Fuji (for the latest H series of cameras). The smartest move they ever made, however, was deciding to source this critical component of the V system from one of the most revered lens makers of all time; Carl Zeiss.
The Zeiss lenses for the Hasselblad are fantastic, and exhibit the excellent sharpness and contrast for which the German company is rightfully known. The range includes some of the classic Zeiss designs; Biogon, Distagon, Planar and Sonnar, with the 80mm Planar being the ‘standard’ lens for the system. The original lenses are known as C type, and use a Compur in-lens shutter. All later types (CF, CFE, CFi, etc.) use Prontor shutters (apart from F series lenses which are for focal plane bodies and have no shutter).
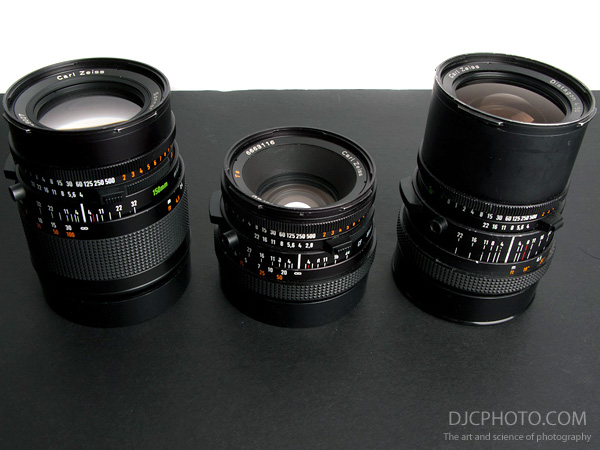
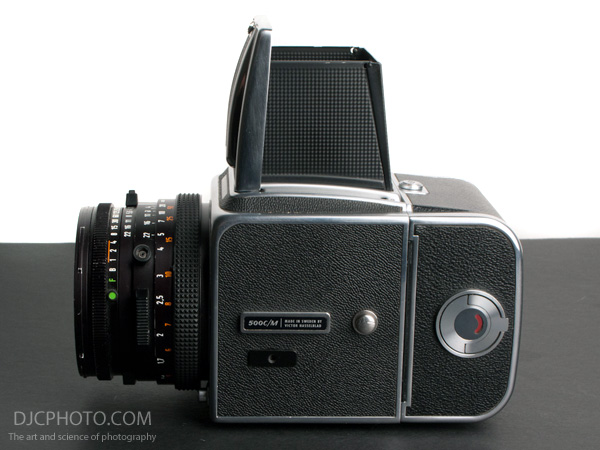
I own three lenses for my Hasselblad; 50, 80 and 150mm, all of the second series CF type. If you are not used to leaf shutter lenses, they may look a little daunting at first with all the scales, markings, rings and switches on the barrel, but they are quite straightforward in operation. From front to back, the first ring sets the shutter speed and is marked from 1/500 to 1 second, and B (bulb, for long exposures). Next is the aperture ring for controlling the diaphragm, and lastly the rubberised focus ring.
The build quality of the lenses is superb and all controls operate smoothly with shutter speed and aperture settings clicking reassuringly into place. The focusing on a well maintained lens is well damped and very precise, although this is partly due to the long throw of the focus ring. Apart from the earliest C series lenses, all Carl Zeiss lenses for the Hasselblad use their patented T* multi-coating on the front lens element which helps prevent flaring when shooting into the light and also increases contrast.
The EV Interlock System
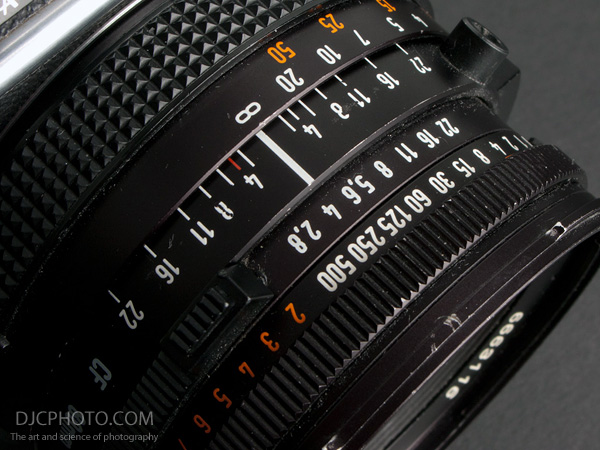
If you look beyond the ‘500’ setting on the shutter speed ring, you will notice a range of additional numbers in orange. These are EV (exposure value) indices and, in conjunction with the small button on top of the aperture ring, allow you lock the shutter speed/aperture ratio for a given EV. To use this, take a light reading with a meter that provides an EV value and then match the orange pointer on the lens to that value by altering the shutter speed and aperture rings.
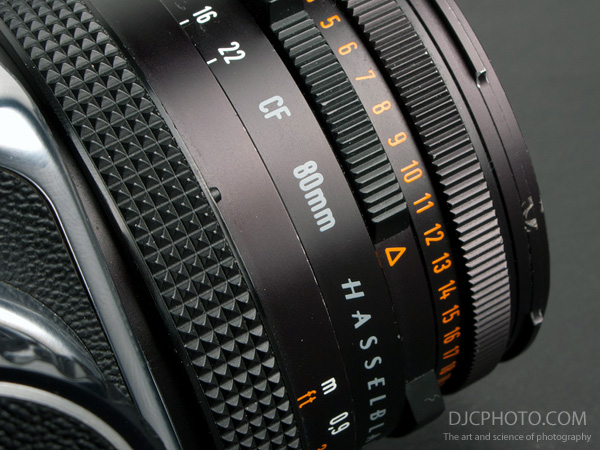
For example, if the EV reading from your meter was 12 and the aperture was set to F/2.8, we can match the orange marker to the ’12’ marker by turning the shutter speed ring to the 1/500 second setting. So we now know that, for the given light reading, the settings of 1/500 second at F/2.8 will give a correct exposure. This is all well and good if we want to use that particular combination, but what if we want to use a slower speed to allow some motion in our shot, or a smaller aperture to give increased depth of field?
On a non-interlocked system, you would have to alter either the shutter speed ring, or the aperture ring, to the required setting, and then also alter the other ring to compensate. On the Hasselblad lenses, however, you can simply depress the interlock button on top of the aperture ring and then turning this ring will also turn the shutter speed ring by an equivalent amount to retain the correct exposure value. This is extremely convenient, and makes working with these lenses very quick and easy. Although the explanation seems complicated, I assure you it is very simple in practice!
The Hasselblad Body
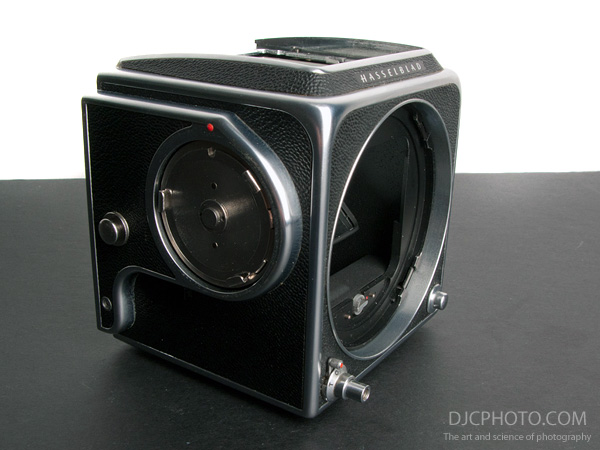
To look at it, the body of a V series camera appears deceptively simple. It’s little more than a box to which you attach a lens and film back, and with a mirror and screen for viewing the subject. Once you start to consider everything that has to happen in a Hasselblad when you press the shutter release button, however, the true complexity and mechanical genius of the body becomes apparent.
So lets look at the mechanical process of making an exposure. We’ll assume that the body and lens are both in the ‘cocked’ state, and the film back is wound on to an unexposed frame with the dark slide removed. This is the default state if all components are correctly synchronised with each other. In this state, the mirror in the body will be in the down position (45 degrees, focusing the image onto the viewing screen on top of the camera) and the in-lens shutter will be open, as will the aperture diaphragm.
The light-tight flaps at the rear of the body are also closed. On pressing the shutter release button, the following series of events is triggered:
- The in-lens shutter is closed.
- The lens diaphragm is stopped down to the selected aperture.
- The mirror is flipped up out of the way of the light path.
- The rear flaps open.
- The shutter in the lens is released and opens for the selected amount of time before closing again.
- On film backs that have this feature, the ‘exposed’ indicator turns from white to red.
That all happens when pressing in the shutter release button. Now, when you release the button, the following happens:
- The rear flaps close.
- The ‘ready’ indicator on the body turns from white to red, matching the indicator on the film back.
The Hasselblad 500 series cameras do not have an instant return mirror, so at this point the viewfinder will be dark as the mirror is still raised. To return the camera to it’s ready to shoot state, you need to wind the knob (or crank) on the right side of the body, which does the following:
- Winds the film on to the next frame and increments the frame counter on the film back by one.
- Resets the ‘exposed’ indicators on the film back and body to white.
- Cocks and opens the in lens shutter.
- Opens the diaphragm to the maximum aperture.
- Returns the mirror to it’s 45 degree viewing position.
As you can see, there is a lot more to these camera bodies than meets the eye. If you were to look under the right panel of the camera, you would see an incredibly complex series of cogs, springs and levers that control this sequence of events. It’s a beautiful sight!
With all of the mechanical inertia being created by that huge mirror swinging out of the way, there may be certain circumstances, such as when shooting at very low shutter speeds, where this may possibly cause a tiny amount of vibration resulting in softness in the final image. To alleviate this, there is a mirror pre-release switch directly below the film wind knob which flips the mirror out of the way. Now when you press the shutter release you only hear the soft click of the lens shutter.

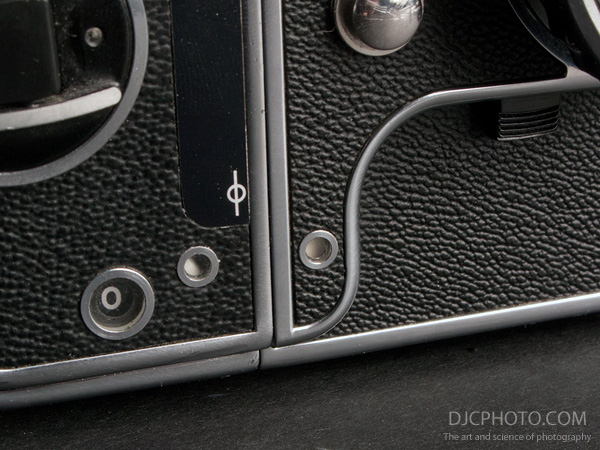
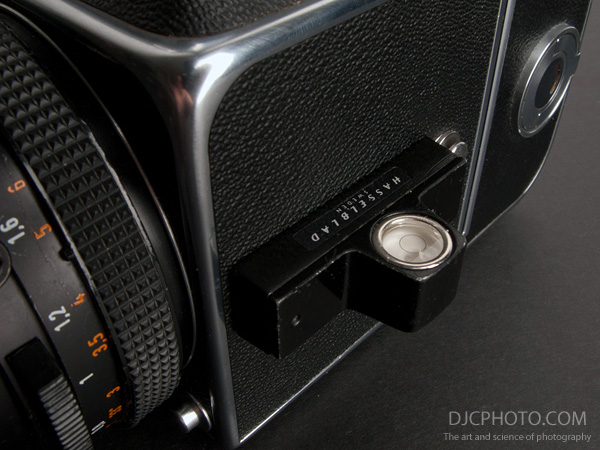
Other external features of the body are an accessory rail on the left side of the body which is used for mounting a cold shoe or bubble level, and strap lugs on either side which take specific Hasselblad connectors. On the lower front left of the body (from the viewing position) is the lens release button, and on the opposite side, the shutter release button.
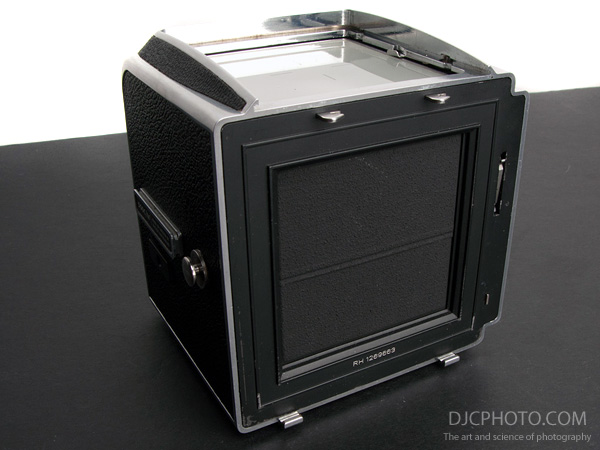
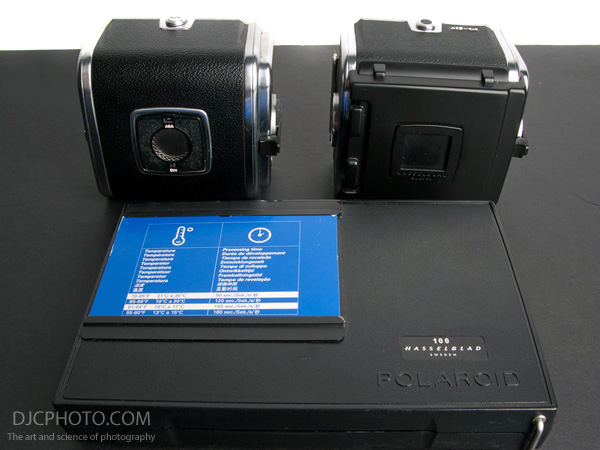
The Film Backs
An important feature of many medium format systems is the interchangeable film backs. This allows the photographer to switch between different film stocks at will, even mid-roll. You can shoot black and white one minute, colour transparency the next, then C41, even Polaroid, without having to finish each roll first. Even if just using a single film type, you can have multiple backs preloaded with film to eliminate the need to interrupt a shoot to reload after each roll.
The film backs are hooked onto two tabs at the bottom of the camera body and locked into place with a catch at the top. A dark slide inserted into the side of each film back prevents the film from being exposed when not attached to the body. The is an interlock feature that prevents a film back from being removed from the body without the dark slide present, and another that prevents the shutter from being fired with the dark slide in place (more mechanical complexity/genius).
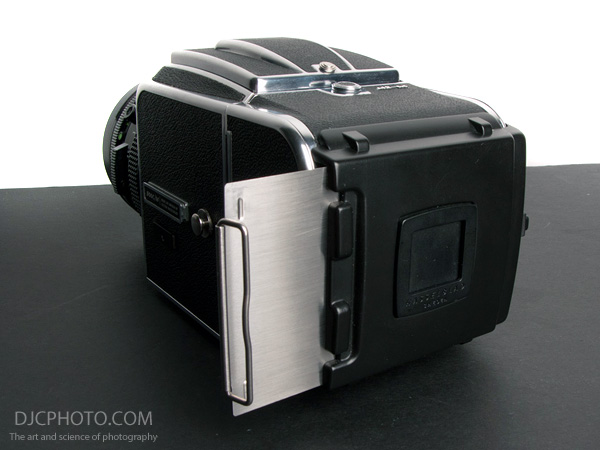
Speaking of dark slides, the dilemma of where to store them once removed from the back has plagued photographers for years. They are made of thin metal and are easily bent if care is not taken. Hasselblad acknowledged this problem with the later film backs by providing a holder which safely cradles your precious slide until it’s needed. These later backs are the ones to get if possible, although they are obviously the most expensive too.
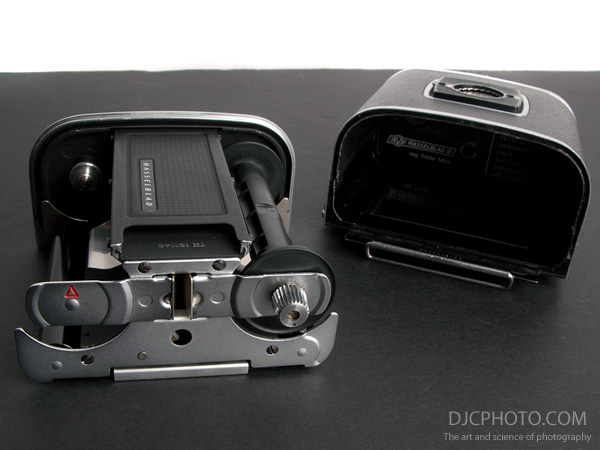
To load film you turn the key on the left side of the back and the film insert can then be slid out. The film path is fairly self-explanatory but care should be taken when new to the Hasselblad that you load it the correct way around. It’s quite a common beginners error to load it backwards which leads to 12 frames of nothing when your film is processed!
Various types of film backs are available, including:
- A12 for 6x6cm on 120 roll film.
- A16 for 6×4.5cm on 120 roll film.
- A24 for 6x6cm on 220 roll film.
- Polaroid back for Type 100 film packs.
There are also some other backs for 70mm perforated film and for producing 4×4 ‘super slide’ format, but these are not commonly used these days.
The Viewfinders
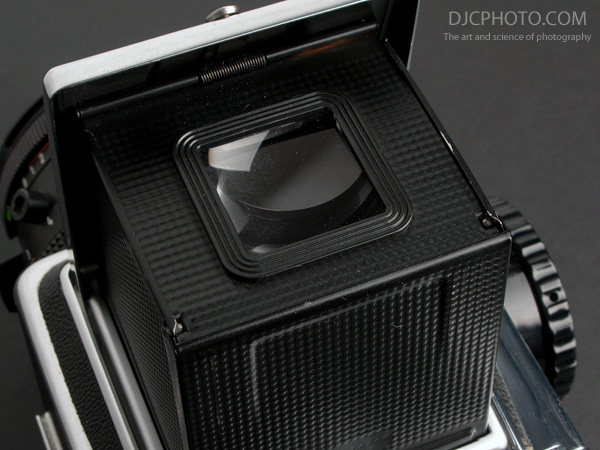
In keeping with the modular nature of the V system, various viewfinders are available for a Hasselblad. The standard finder is the collapsible waist-level finder. This is a fairly simple device that provides a flip up hood that prevents stray light hitting the focusing screen and allows comfortable viewing while looking down on the camera. For more accurate fine tuning of focus, a popup magnifier is built into the top of the hood and released by sliding the catch fully to the right. Simple, and effective. The downside is that the image is laterally reversed on the screen which can take some getting used to.
Other finder options include a magnifying ‘chimney’ finder which is useful for critical focusing and has built in adjustable diopter correction to account for an individuals eyesight, a sports finder (basically a frame type finder for shooting at eye level while prefocused, useful for fast-moving subjects), and various models of eye-level prism finders.
The prism finders are grouped into four different types: metered or unmetered, and 45 or 90 degrees. The 45 degree finders allow slightly lower than eye-level operation that many prefer (myself included), whereas the 90 degree finders give you true eye-level operation. There have been many different metered prisms over the years, with various differences between each model. All that I have used have been accurate and simple to use, although the PME90 that I used to have was fairly complex due to it’s multiple measuring modes.
Although the prism finders add weight and bulk to a V system camera, it makes the whole medium format experience a lot more comfortable for many photographers, particularly if coming from a 35mm system.
The Other Stuff
The Hasselblad system is huge and comprehensive. Other components include a vast range of interchangeable focusing screens, a wide selection of closeup accessories (extension tubes, diopters, bellows, etc,), various grips to make handling easier, filters, cases, bags, and even some esoteric items such as an underwater housing! Suffice it to say that if you have a need for a particular accessory, it’s probably already available.
Example Configurations
Although there is no correct way to configure your Hasselblad for a particular photographic task, I’m going to show how I configure mine for a few different shooting scenarios. Everyone is different, and I’m not for one minute suggesting that these setups will be suitable for anyone else, but it will demonstrate the flexibility of this amazing system.
General Photography

If there was ever such a thing as a ‘standard’ configuration, this is it. The classic Hasselblad kit of 500 series body, 80mm Carl Zeiss Planar lens, A12 film back and waist level finder. With this setup, a light meter and a few rolls of film in your pocket, you’re ready to tackle the majority of general purpose photographic tasks. In fact, I’ve seen amazing portfolios from photographers who use only this setup (check out the excellent Hasselblad 80mm blog for some examples).
The Carl Zeiss Planar lens is legendary; it is extremely sharp, has fantastic contrast, and renders images in a very special way. The 80mm focal length provides roughly the same field of view as a 50mm lens on a 35mm camera, and it is very close to how the human eye perceives a scene, making it the perfect standard lens. Suitable for everything from landscapes to portraits (except for tight head shots as it does not focus close enough), it is the perfect lens when you want to travel light.
Going Wider
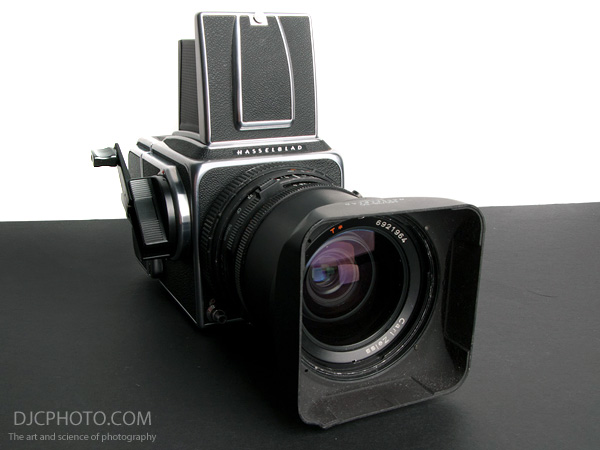
If you like a slightly wider view on life, ditch the Planar and pop on a Distagon! This Carl Zeiss 50mm lens has a roughly equivalent field of view as a 35mm lens on 35mm film, and gives you a pleasantly wide perspective without the bulk and weight of the wider 40mm lens. The Distagon is a great lens with fantastic sharpness at the center of the frame, although it does fall off very slightly towards the edges, but this is not noticeable in all images. The T* coating provides good resistance to flare, although the lens hood is recommended for the best results. This is a great focal length for landscapes, urban scenes and environmental portraiture whilst still being hand-holdable in everything but the worst light.
When shooting with a wider angle lens it becomes more important to be aware of holding the camera level with the horizon, unless you are after a particular stylistic effect. To aid in this, I’ve made a couple of changes to this configuration. The first is to fit a grid type focusing screen in place of the regular screen which gives me a constant visual reference for aligning horizontal and vertical lines in a composition. The second is the addition of the Hasselblad bubble level which slides onto the accessory rail on the left side of the camera body.
Macro Photography
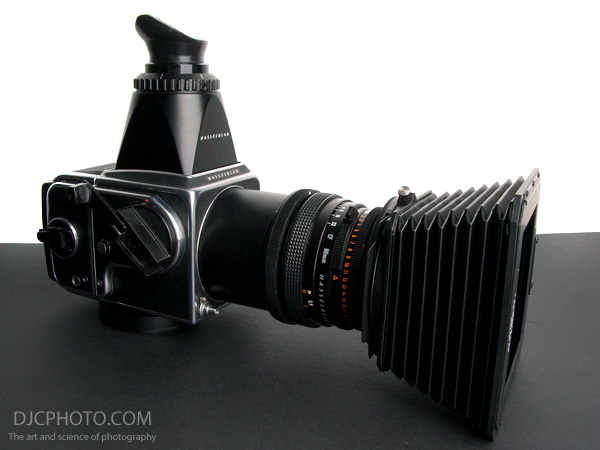
Macro or closeup photography is very well catered for in the Hasselblad system. The Proxars are glass diopters that attach to the filter mount of your lens and provide close focusing (the closest focusing distance is determined by the strength of the diopter). These are very convenient to use and, unlike extension tubes and bellows, they do not require any exposure compensation when using them.
Personally, I prefer the extension tubes, and they are available in various extension lengths, from 8mm to 55mm. They mount on the body and your lens then mounts onto the tube. Unlike the Proxars, you are not adding any additional glass elements into the image path, so you do not get any degradation of sharpness or other unwanted aberrations when using them.
Although you can use the larger tubes for true macro photography, the smaller tubes are also very useful for reducing the close focusing distance enough to enable tightly framed head shots, and for this the 8mm and 16mm tubes are perfect for the 80mm and 150mm lenses respectively.
The setup shown will focus very close, enabling me to fill the frame with the smallest of objects. The 80mm Planar lens is mounted onto a 55mm extension tube, and I also use the magnifying chimney finder to aid in critical focusing as the depth of field is greatly reduced as such close distances (high magnifications). A compendium hood ensures that no contrast-robbing stray light hits the front of the lens.
See an example macro studio setup, and a few examples, here.
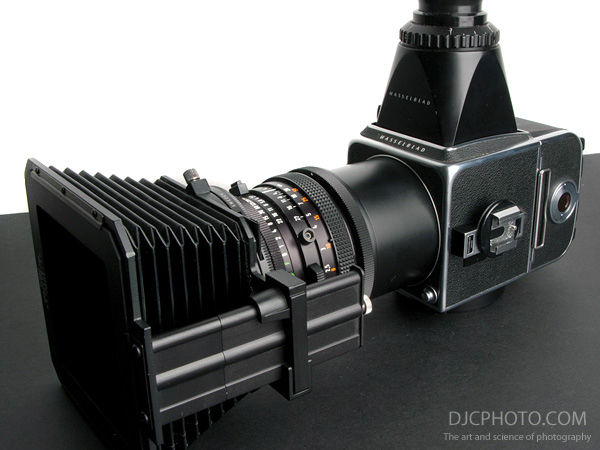
Portrait Photography
I am a huge fan of tightly cropped portraits, either head shot or slightly less than quarter length. I also prefer to use a prism finder to bring the camera level up nearer to the sitters eye level. Victor Hasselblad designed the V system camera to be operated at waist or chest level, and it is ergonomically perfect when shot in this manner. At eye level, however, it is not the most comfortable camera to use unaided. The solution, for me at least, is to use the left hand flash grip. This inexpensive accessory bolts onto the camera using the tripod bush and provides an extremely comfortable solution for eye level shooting.
The prism I use is the original 45 degree PME metered finder. Once you’ve set the maximum aperture of the lens you are using, and the film speed, a quick press of the front mounted power button will give you an accurate through-the-lens light reading of your scene. The readout in the viewfinder is in EV (Exposure Value) and it’s a simple job to transfer this reading to the lens (all V system metered prisms are uncoupled and require manual setting of the lens to match the metered value).

My favourite lens for portraits is the 150mm Carl Zeiss Sonnar and it is shown here in conjunction with a 16mm extension tube as this lens is not known for it’s close focusing capabilities! The Sonnar design makes for beautifully rendered portraits without being too sharp (your clients will thank you)!
Although this setup looks bulky and heavy, it handles surprisingly well with your left hand on the grip and your right cradling the underside of the lens, where it can also handle focusing, shutter speed and aperture adjustments. The grip has a trigger release built in for even more convenience, and a cold shoe on top which is useful for mounting a radio popper for triggering your strobes.
Conclusion
There are many reasons why I love the Hasselblad 500C/M; the mechanical precision, the quality feel that you only get from a hand-built machine; I even love the almighty clatter it makes when you release the shutter! But, above all, it’s the quality of the results that keep me coming back to this system. The Carl Zeiss lenses are unmatched, and every time I pull a freshly developed roll out of the tank I am blown away by the images that this thing produces, roll after roll after roll.
It’s also a camera that simply does what you tell it to do. You are in control of all aspects of the image making process, without a computer making exposure or focusing decisions for you. In fact, if you produce negatives or transparencies that are not of the highest technical quality, you only have one person to blame!
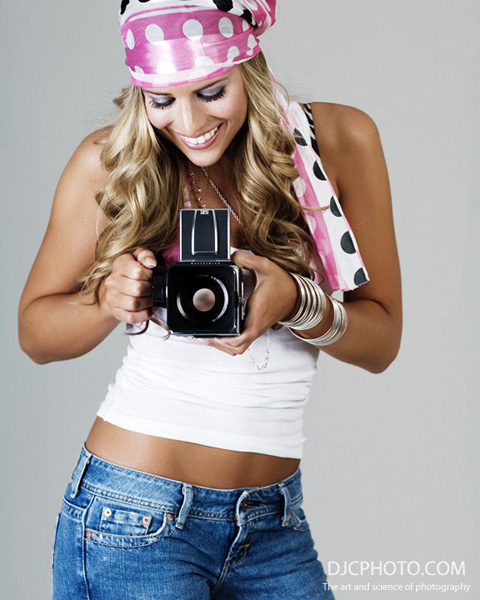
Apart from a few taken with my Rolleiflex, the majority of the square format images in my portfolio were shot with a Hasselblad. All images in this article shot with a Canon G9, except for the lead image of Kendra, for which I used a Nikon D2X.
This is a great article !! Beautifully written and illustrated.. Would it be possible to email it, with the photos, to two friends:
Sasha Bromberg maryberg27@gmail.com
Chrystie Sherman shazhkin@gmail.com
or send me a copy I will forward johnpschupf@aol.com THANK YOU
PS just bought another 80mm 2.8–still a great lens Do you know where I can get an elt fixed at a reasonable price?
see above !
Right click on browser bar and send it to yourself!
I’m reading this comment almost a decade later and marvelling that while this guy managed to find and read this article, not only did it never occur to him to just email the URL to his friends (instead he wanted the author to go through the trouble of copy/pasting the text and attaching all the images to an email) but he also publicly posted the names of his friends, himself, and all of their emails. Publicly. It’s amazing.
And then he bumped his own comment not one minute later!
It was 2012 John, not 1996, the internet wasn’t new! What on earth were you doing? I hope none of you ended up giving your banking information away to any Nigerian princes who needed a trustworthy overseas confidant to help them get their fortunes to safety for a tidy helper’s fee.
Thanks for the chuckle!
PS back in 2012 you could have reached out to David Odess for repair services. Still can.
What exactly is the connection ‘below’ the accessory rail for?
This hole accepts a small hook which was designed to hold a flash cord connected to the PC terminal on the lens, to prevent any strain on the cord or terminal. I’ve never seen one though!
Thank you so much for this article, got inspired and just bought one….
Exceptionally written article. I am curious what do you use to meter your Hasselblad shots? and any recommendations on meters, film, or development. Obviously you have tried a numerous amount as your portfolio reflects such. Thanks for your time.
Thank you! I generally meter using a Sekonic L-758DR meter. It was quite an investment but handles ambient (spot and incident) as well as flash metering and has been very reliable. When traveling light, however, I’m quite happy using a little Sekonic Twin Mate meter.
For film, I mostly shoot black and white, and favour Tri-X or Neopan 400, and occasionally Tmax if I want to print really big. I use Tmax developer for the latter and D-76 or Kodak HC-110 for the more traditional emulsions.
I don’t have a particular favourite in colour film, although I’ve just bought a few pro packs of Ektar which I am looking forward to trying.
Thanks for the quick response. I am on the hunt right now for an incident meter. Currently using a Pentax spot V which is accurate but somewhat bulky. Been doing some film testing with HC-110 as well and find it easy to work with both in traditional and stand development. Tri-X is on its way to me and I have a feeling that will be my go to BW film but I ve never shot it in 120, only in 35mm and that was over 15 years ago. Keep up the great work on your site.
can you talk more about how the quality differs from other types of cameras? Thank you.
Just a question of belive (it or not).
A lot of people say the Mamiya 6 ist the best medium format
ever because it´s small for travel.
A lot of people say the Hasselblad is the best because of it´s
toughness and the Zeiss lenses.
I work a lot for advertising in my studio and if I dont have to
use a 4×5″ camera I prefer the Maniya RB 67 because the
rotatig back and it´s easy to make dobble exposures.
I just bought this same camera, so excited & trying to learn everything since Im new to film. For one the back does not have any writing on it so Im not sure what it is other that I know its 6×6. I love the the FujiColor Pro 400H film but is it possible to get a version of it for my camera, Im not sure how film works, if certain ones are only available for certain sizes or if they make them all available in most sizes to include square format? Is it possible to get a back for the camera so Im shooting in 6×4 instead of 6×6? Last, the camera has a carl zeis 2.8, I want to shoot wide open as much as possible but with the camera only going up to 500 of a second on shutter speed ill need to find a way to reduce the light coming in, im guessing a filter is the best? What filter would you recommend? Ill mostly be shooting wedding both in and outdoors. Love your article, thank you in advance!
Hi Ashley,
Yes, you can get 400H in 120 roll film, which is the size film you need for most Hasselblad backs. They made a 220 film back, but finding film in this format is difficult now. It provided the same 6×6 format but you got 24 exposures instead of the 12 you get with 120. You can get the 120 from Freestyle, B&H and others:
http://www.freestylephoto.biz/02301418-Fujicolor-Pro-400H-400-iso-120-size-Single-Roll-Unboxed?cat_id=1103
Hasselblad did make an A16 back, which gives 16 6×4.5cm frames on the same roll of 120 film. You may be able to find one of these on eBay or at KEH.
For reducing light reaching the film, an ND (neutral density) filter is what you need. These come in various strengths of reduction, typically rated in stops. That said, lots of 400H users tend to rate it a bit slower than the box speed as they prefer the colours when a little overexposed. I rate it around 250ASA, which gives you a little more latitude before you run out of shutter speeds!
Have fun with the Hasselblad!
Fantastic article.
Thanks, Alex.
I’m eyeing a Hasselblad 500c body on ebay. My question is regarding lenses. Are there other lenses that can be used with this camera other than the Zeiss brand? If so which ones? Ideally I’d like to find something on ebay as well so I can purchase both at the same time. Any info is greatly appreciated! Thanks.
No, the V series Hasselblads will only take the Carl Zeiss lenses made for that system. I do not know of any third-party lenses that were ever made for the system.
I have an early model 500cm and I am encountering viewfinder cut-off at the top of the frame when using longer lenses. I am considering getting a newer model if this problem can be eliminated. Please advise as to which model is available that can give me a full, clear image. Thanks in advance.
Hi, Michael,
In the non-motorized bodies, the 501 and 503 series use the Gliding Mirror system which eliminates the viewfinder cutoff with longer lenses. In the motor-driven bodies, I think anything later than a 500ELX also has GMS.
quick question, When attaching a lens thats does’t have a leaf shutter, is there a default shutter speed that the body of the camera uses? Just got an Arsat 30mm without a leaf shutter, just curious how to expose properly if you have any advice I would greatly appreciate it.
The short answer is no. However, the rear shutter (the one that closes off the back of the body) can be triggered manually, and even has an X-sync connector right below the accessory rail on the left side of the body. And, no, the M sync (flash bulb) won’t work.
Hi, I’ve attached spirit bubble level to my hasselblad but it won’t come off. Is there a trick to it? Thanks
I don’t have my Hasselblad with me, but from memory, you have to pull the bubble level attachment away from the body slightly to release the spring catch, and then slide it off. I can test it tonight if you don’t want to try it.
Thank you for this very comprehensive overview. I’ve had my 500CM for about 6 years and already knew about the shutter pre-release. I use this most of the time. I was fortunate in obtaining my Hassy from a specialist dealer who had accepted in in PX from it’s one owner. Apart from the camera, I got ever ready case, strap, lens hood, original instruction book and other papers. I’ve resisted the temptation to buy other lenses as I could not carry them in the ever ready case. I’ve just bought an extra A12 back. Thus I carry 12 in the camera, 12 in the spare back in jeans pocket and 12 as a roll in my shirt pocket. That gives me the same number of exposures as my Nikon F. I’m particularly grateful to this review for explaining how to use the EV numbers on the lens ring. My Weston V has these marked on the calculator dial. Now, with better weather soon to come, I can start using this system. Following the habit I formed when using a pre-WW2 Rolleiflex, I only shoot Fuji slide film. This was accidentley dropped, and having no idea where to go for repair, I bought the Hassy. A couple of years ago in Stratford on Avon, an old Yank guy exclaimed “you must be very old!” (I was 40 at the time)
A hand-held meter, especially for travel and outside use that I can most strongly recommend is the Gossen Lunalite. It uses 3 LEDs instead of a meter needle. I have even dropped mine and it still works fine. I have now acquire a second one to use with my Leica M3. The 9v PP3 battery is available widely, Avoid the ones that take the 1.35v Mercury battery, not worth the hassle. Another, more recent variant is the Multisix. This too takes the 9v battery and is an LCD readout. However, despite also now having one, I have to say that it’s quicker to reset the ISO on the older models with the big dial. However, Gossen have been very helpful in providing a large label on the back of the Multisix to guide you in making changes to ISO, shutter priority/ aperture priority/ EV readouts etc. Try to find a meter with the hard type of leather case. More protection.
Hi, please help me here. You state : “For example, if the EV reading from your meter was 12 and the aperture was set to F/2.8, we can match the orange marker to the ’12′ marker by turning the shutter speed ring to the 1/500 second setting. So we now know that, for the given light reading, the settings of 1/500 second at F/2.8 will give a correct exposure. But it is not clear how you arrived at 1/500th as the correct combinatin at f 2.8
Great Read Dave, Very well done, I was lucky enough to find an NIB condition Hassy 500CM, I decided to go the extra mile and send it in to David Odess for a comprehensive CLA. I did shoot one roll of Ilford XP2 through it and scanned a few of the frames with a Heidelberg drum scanner. The results have me really pumped for shooting next Summer
Can you tell me about the Hasselblad’s battery? Is it necessary to have a battery pack? What about a battery converter to 9V, are those any good?
If you have a motorised Hasselblad (EL series) then, yes, you will need batteries for it to work. The original batteries were specifically designed NiCds which tend to be unreliable as they get older. They can be re-celled but the most common approach is to buy, or make, a 9v adapter. The later motorised cameras use five AA batteries, and this is what I have so I haven’t used a 9v adapter, but they work very well by all accounts.
Non-EL cameras, like the CM in this article, are completely mechanical in operation; batteries are only required for the metered prism if you use one.
What a beautiful, comprehensive article. Extremely well written, Thanks! Just purchased my first Hassy and can’t wait to shoot!
Thank you! I’m glad you enjoyed it. You’re going to love the results from the Hassy!
Quick question Dave, I also bought the 150mm Sonnar T like the one in the picture you have here. I can’t figure out what that lever just below the flash hook up does. I press it down and it stays pressed? Do you know what this lever does? Thanks in advance!
That is the depth of field preview lever. When activated, it will close down the lens to the opening set on the aperture ring. Pressing the lower edge of the switch should release it which will return the aperture to the fully open position.
Wow fast response Dave! Thx! I thought it may be a self timer but this lens doesn’t appear to have that option.
No problem. You’re right, no self-timer on any other than the original ‘C’ lenses. I’m not sure why they dropped it, but suspect it may have been easier to implement on the old Compur shutters compared to the newer Prontors.
Hey Dave another quick question. I wanna use a Canon flash on my original “C” lens. Do I just connect with a male PC flash sync cord? Been searching all over the internet for the answer but can’t seem to find it. Do you have experience with those older lenses?
Sorry for the late reply. Yes, just connect a regular PC sync cable and you’re good to go. Don’t forget that you can use any shutter speed for flash photography with a leaf shutter, which is very useful.
Thank you for such a well written article! I just found this camera in never used condition from my grandfather’s collection. I have a question though if you could please take the time to answer
1. I have never used medium format cameras but I want to buy maybe a used digital back and start using this camera. What type of digital back would you recommend I use with this camera? Phaseone/Hasselblad and which model?
2. Can this camera be used with Strobes? What do I need to do that? I have Profoto B1 strobes that I borrow from a friend often.
Thank you so much in advance for your time and answer.
Thanks Mila, glad you enjoyed the article.
1. Unfortunately I have no direct experience with digital backs on the Hasselblad. I did do some research a while back when I was considering getting one, but I’m not sure the conclusions I reached from that research would necessarily be helpful. I will say that I saw some incredible looking images even from the original Hasselblad CFV-16 back, so I can imagine that the later backs perform even better.
2. Absolutely it can be used with strobes, and with the leaf shutter it is ideally suited to flash photography as you can sync at all shutter speeds. A regular PC sync cable is all you need to trigger your Profotos.
This was a very well written article and most complete. Thank you for taking the time to write it and sharing it.
Yep a very good article. Using my 503 cw with 150 mm lens and 16 ex tube. Loving the results.
Wow, wonderful article with many operational concept alien to a 35mm or 645 shooter well explained. Especially the double cocking thing! (The Hassy manual sucks at explaining that!) Thank you.
Great article very useful, im just about to buy my first medium format camera and have settled on the hasselblad and after reading various blogs going for a 500cm with an 80mm and a 150mm Zeiss lens. can not wait to get
Great choice! My two favorite lenses as well.
I did some architectural shooting with a 500 C/M and an 80mm planar with Velvia 50 last weekend, Cant wait to drum scan
Got my 500CM last week, started shooting now, love it!
Great stuff! These fantastic cameras deserve to be used!
Terrific article, just got my Hassie 500c/m. what is the lever under the winding knob?
It’s the reflex mirror pre-release lever. I mention it in the article, just under photo nine. Have fun with the Hassie!
Thanks for your article. I use mostly 35mm and recently use MF mamiya 7 and love the MF image , im about to explore further with non rangefinder particularly TTL easier for filters for landscape, interchangeable back and relatively cheaper and broader assortment of lens. This article helps a lot.
i would like more info on he hasselblad line of cameras
Thank you for such an informative article! I just acquired a 500C/M with the PME5, 80 and 120mm Carl Zeiss lens. In addition to the magazines it also came with a Polaroid back. It looks like I may be out of luck with regard to film for it, do you have any suggestions?
I’m jealous of your 120mm lens! As far as instant film, it’s very thin on the ground now. There is still some of the Fuji colour pack film to found, but that’s about it, as far as I know. It’s a shame, because it was a great option for quick tests with the Hasselblad. B&H currently have some, and it’s reduced at the moment too.
https://www.bhphotovideo.com/c/product/18595-USA/Fujifilm_15435626_FP_100C_Professional_Instant_Color.html
You might want to check out Blue Moon Camera in Portland: http://bluemooncamera.com/index.php
The are big into real film, old cameras, and as they say, “one of the last optical processing labs”. I had them CLR one of my 500CM bodies and 80mm lens. They did a nice job.
hola, me podrás decir cual es el tamaño de la lente Carl Zeiss 80mm Plannar porque necesito comprar filtro amarillo y no se que tamaño debo pedir. Muy bueno el artículo. Gracias!!
Planar C (Compur shutter) = Bay 50
Planar CF, CFE (Prontor shutter) – Bay 60
¡¡¡Muchas gracias Dave!!!
A very good article David. I picked up a 500cm a few years back and keep promising myself to get out with it, a new years promise to myself.
Still have a 500 CM with a old Sonnar 4,0/150 C left after I sold all my Hasselblad gear.
For me this combination is all I just need even when I go on a holiday or city trip.
Focused on the true essencial it can give you a push when you get stuck in your photography developement.
On a recent trip back home to England, I took only the 500C/M and 80/2.8. It’s nice to get back to basics sometimes!
There was a discussion on Luminous-Landscape and other places about the dynamic range of film vs digital. The conclusion was that a wet scan of film was sharper and had greater dynamic range that digital. When backs for the Hasselblad approached 50 to 75mb, you then might see parity in image quality. For now, I’ll stick with my flatbed scanner, saving my pennies for a good used drum scanner…
I did the digital thing for a few years and loved the flexibility it offered, but for whatever reason, I still love the look of a image shot on film, and I also enjoy the darkroom work. I have been 100% film again now for ten years or so. I work with computers all day long too, so it’s nice to get a break from them!
Just for giggles, if you want to know more about the age of your Hassy, here is a great site (or did I first learn it from you, Dave?) ;-)
http://hasselbladhistorical.eu/Index/HWIndex.aspx
Hah, you may have! It’s a very good site for information and I’ve used it a lot in the past.
I too, use it a lot. I had a 501CM that I sold in 2007 to move to digital. My Canon is great, but I missed that “Kerplunk” when you pressed the shutter. So….I was very lucky to find a buy on eBay of three 500ELX’s along with a 150mm, and many other accessories for an embarrassingly low price. Probably an estate sale from someone who had a photo studio. I also pick up a 500cm along the way. I swear by KEH and picked up a couple of additional lenses, polarizing filter, extension tube, etc. Now I just need to get away from my computer and go out and shoot some pics.
I got a lot of Hasselblad gear from KEH too over the years. Very slim pickings on there now though; I guess there are just a finite amount of these old cameras still working, and my hope is that they are all now in the hands of people using and appreciating them again.
Now turn that computer off :)
LOL!! I’m a CPA. The tax season is starting early this year, with tons of work already in. Jeesh
Bring back the abacus!
Hi Dave,
What is the best year Hasselblad 500 CM to acquire? Or are all of them the same?
Thank you!
As far as I know, there were not any major changes made over the lifetime of the 500 C/M model, so I would just look for the best one you can find that is within your budget. Bear in mind that the good cosmetic condition of a camera does not necessarily mean it is mechanically good. It is quite possible that a pristine looking camera looks that way because it has been unused for years, which could mean a sizable amount of work to get it into good operating condition.
What a fantastic review of this legendary camera. Thank you.
I have the Hasselblad 500c/m. I exposed the last frame in the camera. I want to rewind the exposed film but the winder will not turn. Is there some sort of release button I have to push first? Thank you for your time.
On the Hasselblad, and all roll film cameras, you don’t rewind the film like you do with 35mm. You simply need to keep winding forward until you feel the film completely wind onto the take-up spool. It should be obvious when you reach this point as you will feel the lack of resistance as you wind. You can then remove the film and use the self-adhesive tape to seal the film onto the spool. One you’ve done this you can take the now empty feed spool and move it to the take-up side ready for your next roll.
Great review of a beautiful Camers
Dave , I recently bought a 503 c/m from Japan. The body and film back ( a 16 A) are completely black and do not have that characteristic shiny chrome edging that I see in pictures of the 503. What is/are the difference ( Date of production, etc. ) ?
Although there are some minor differences between the various production models of the Hasselblad backs, there is no difference between the chrome and black variations. It is purely a cosmetic thing, and the two styles were made to complement the chrome and black bodies. Quite often these are mixed and matched though, which is what appears to be the case with your 503.
Zeiss and Leica Lenses are the best.
No other lenses can touch these lenses.
Just read this article again!!! Good stuff…..one question I had was what are the requirements for changing the lenses….does the shutter have to be cocked or was in the protocol for this…..thanks for your time. Best Mark
Thanks for reading!
Yes, both body and lens must be ‘cocked’ before changing lenses or you will get a situation where the mechanisms are out of sync with each other. Check the body is cocked by looking at the small indicator window on the rear right hand side of the body to confirm it is white. If not, just wind the film advance crank or knob to achieve this. You are then safe to change the lens.